The journey of a print
This print Alyssum, is one I've developed as part of my Artist in Residence work at Winterbourne House & Gardens, University of Birmingham, Edgbaston.
It began with a painted sketch done on site which was then cleaned up on the computer and digitally altered into a repeating pattern. I also played around with colour options settling for white on a colour background as I felt it best represented the flower itself. Using a sublimation printer, I then printed a piece of heat-transfer paper and printed some fabric using the heat-press.
[gallery ids="eyJ1cmwiOiJodHRwczpcL1wvcGFpbnRkcm9wc2tlZXBmYWxsaW5nLndwY29tc3RhZ2luZy5jb21cL3dwLWNvbnRlbnRcL3VwbG9hZHNcLzIwMjBcLzA1XC9hbHlzc3VtLXNrZXRjaC5qcGciLCJ0aXRsZSI6ImFseXNzdW0gc2tldGNoIiwiY2FwdGlvbiI6IiIsImFsdCI6IiIsImRlc2NyaXB0aW9uIjoiIn0=,eyJ1cmwiOiJodHRwczpcL1wvcGFpbnRkcm9wc2tlZXBmYWxsaW5nLndwY29tc3RhZ2luZy5jb21cL3dwLWNvbnRlbnRcL3VwbG9hZHNcLzIwMjBcLzA1XC9pbWdfODczNy5qcGciLCJ0aXRsZSI6IklNR184NzM3IiwiY2FwdGlvbiI6IiIsImFsdCI6IiIsImRlc2NyaXB0aW9uIjoiIn0=,eyJ1cmwiOiJodHRwczpcL1wvcGFpbnRkcm9wc2tlZXBmYWxsaW5nLndwY29tc3RhZ2luZy5jb21cL3dwLWNvbnRlbnRcL3VwbG9hZHNcLzIwMjBcLzA1XC9hbHlzc3VtLmpwZyIsInRpdGxlIjoiQWx5c3N1bSIsImNhcHRpb24iOiIiLCJhbHQiOiIiLCJkZXNjcmlwdGlvbiI6IiJ9,eyJ1cmwiOiJodHRwczpcL1wvcGFpbnRkcm9wc2tlZXBmYWxsaW5nLndwY29tc3RhZ2luZy5jb21cL3dwLWNvbnRlbnRcL3VwbG9hZHNcLzIwMjBcLzA1XC9zY3JlZW4tc2hvdC0yMDIwLTA1LTEzLWF0LTE0LjA3LjQzLnBuZyIsInRpdGxlIjoiU2NyZWVuIFNob3QgMjAyMC0wNS0xMyBhdCAxNC4wNy40MyIsImNhcHRpb24iOiIiLCJhbHQiOiIiLCJkZXNjcmlwdGlvbiI6IiJ9" type="rectangular"]Then I ran up a cushion and added some bobble trim et le voici!
Artist in Residence, Winterbourne H&G

My residency period at Winterbourne House & Gardens is coming to a close at the end of this month so I thought I'd catch this space up with some of the work I've completed.
There has been a wealth of inspiration - too much to do full justice to. I have had to pace myself and just do what presented itself in the moment.

Sometimes that was scenery and sometimes individual plants.

And it's fed into the production of all sorts of outcomes which I'll share here - textiles, printed and embroidered, paintings, pattern designs and two sketchbooks bursting with reference material. Videos of these are best seen on my Instagram pages- one here on my Residency page www.instagram.com/artist_winterbournehg and one on my personal Instagram page instagram.com/claire_leggett - both up at the top in the Hilights reel.

Cyanotype printing
You know what they say about making Cyanotype prints while the sun shines?! Yesterday was a fun Cyanotype printing day but I've been prepping for this project for some time. Here's a little of how I went about it for those interested.

Back in early Spring when plants were just putting out their teeny tiny leaves, I braved the frost to cut and press some of them because I knew the size would be perfect for some illustrative cyanotype prints. The down size was trying to pick them up in a dimly lit room but more on that later.

I used the Jacquard Cyanotype set and coated the fabrics one night once it had got dark. It wasn't all that easy - all I'll say is get everything laid out right side up and have plenty of room and plastic to lay them out to dry but expect to be doing it fairly blind. I then put them in a lightfast box before going to bed so that the morning sun didn't begin processing them before I was ready.

I was also really prepared with what I wanted to create and laid all the elements out on trays in an organised fashion. I began in one of our shadier rooms but as the sun came round the fabric began exposing while I was setting it up so I ended up in our outhouse which has no windows - this did mean that a lot of what I was doing was from memory and not because I could particularly see well. A lot of the lovelier small or fragile items didn't get used because I simply couldn't see to pick them up!

These two photos show the treated fabric changing from green to blue as the sun begins to process the chemicals and the resulting print - this one was a really deep indigo which I put down to it being a 100% cotton fabric.

I tried coating a variety of fabrics - polyester, nylon/cotton mixes, textures, old cotton and linens. My favourite results were the high cotton content fabrics but the nylons do have some winning results such as the shine and the ghostly quality. I intend sewing into mine so I'm happy at this stage if the print isn't 100% perfect.

I also prepped some acetates of my own hand-drawn elements taken from pattern designs I've made. They don't print as cleanly as paper or solid objects and the acetate edge can catch the light if the sun is at a low angle; but it's a great way to incorporate your own design personality into your prints.

This is a gold polyester print - a lot of the coating washed out of the fabric so it's a very pale print. I wouldn't waste the product on non-cottons again but I'm glad to have experienced the difference.

This is a selection of my favourite illustrative prints. Where there are white empty spaces I intend to fill in with stitches and fabric foiling.

I had a lot of success with vintage doilies and lace and through trial and error realised that the item closest to the fabric prints the strongest which made layering up items interesting (in other words the opposite to the picture below - bird/rabbit underneath doily to print).

This one is going to get framed just as it is as there something perfect about it to me.

The acetate allows some light through (it isn't as good at masking as black card is) but it does create a blue print rather than a solid white space( see rabbit below) so that adds an extra layer of interest.

Some of the fabrics with an unidentified mix of cotton/polyester gave up prints on a different scale of blue -these will have also have their uses as contrasts once I start cutting and sewing. Its a much softer result.


Some even came out a lovely Colbalt blue.

Each print took 30 mins in the UK sun (on a hot sunny day for us) so it was a time consuming activity and I'd coated a lot of fabric so it was a long days work. I believe (from inference) that you can store coated fabrics for sometime in the dark but we don't often have reliably sunny days so I went for it while I could which was the right call as it's cloudy today.

I think I've made enough stock to keep me busy for sometime anyway!

So here's my top-tips for cyanotype sun-printing if you think you're going to give it a go:
You need to weigh the items down on the fabric to print with some glass or acetate - so measure your fabric prior to coating so that it's not bigger than your glass. Otherwise you print the edge of the glass.
Once you've coated your materials and put them in a dark place try and create a system so that you know which is coated-side up. I got into a muddle and wasn't always sure I'd printed on the side I'd painted the chemicals onto.

Know your materials before you go into the 'darkroom' to place them on the fabric. Maybe even lay them out ready. And I found having things on a lightly coloured tray helped me to see what the shape was in the dark!
If you want indigo prints then stick to high cotton content fabrics.

I'm glad to say I still have another half a bottle of each of the chemicals so can mull over repeating this activity again.
How to make a thread & applique picture

Here we are at the end of week 3 COVID-19 quarantine and here’s a Stay Home project to share with you. Sometimes my Textile students can’t always see how to get to the next step of using fabrics they’ve made so I thought I’d do a little tutorial showing the stages of creating a fabric and thread picture for anyone who wants to have a go. You won't find me making a video so it's old-school text and photos!

First find your inspiration - mine was my lovely Mothers Day gifts this year; a cute vintage Booths jug and some joyus tulips and I knew straight away that I wanted to make an applique and stitch picture of them as they had so many elements that lend themselves nicely to that way of working.

2. Using a 24-hour-fade fabric marking pen, I sketched the tulip petals imagining the whole petal so that I could layer them over one another to build a Tulip flower later on.

3. The nylon fabric needed stabiliser ironed onto the back to strengthen it enough to sew it using the sewing machine. The other fleece fabric didn’t need any extra weigh adding.

4. You don't have to have a sewing machine that can do free-motion machine embroidery, you could just use your forward and reverse functions to layer up lines of stitch to mimic the markings on a Tulip petal. I changed colours a couple of times too.

5. Then I spent a few hours hand stitching large running stitches of colour to capture the hi-lights and contrast colours in the petals. I even added a little shiny luxe thread to catch the light and add visual interest.

6. For the jug I ironed a lovely old piece of cotton onto some stabiliser and then sketched the outline of the image from the jug.

7. Then using the free-motion machine embroidery function of my sewing machine I ‘drew’ over the sketch using indigo thread.

8. I won’t lie - the 24hr pen did not fade overnight (never happened before) and so I had to gently wash it out.

9. Next up was a root through my bag of fabric again - I found this piece of mono-printed screen-print which was perfect for the tulip leaves.
To make getting the shape nice and easy, I cut one off the now-nearly-dead tulips.

10. All they needed was a few free flowing lines to give the texture of Tulip leaves and I used a variegated green-yellow thread on the sewing machine.

11. I played around laying out pieces of fabric that I loved or felt would add a nice contrast as the background until I found the perfect combo - the reverse of a piece of stencilled indigo fabric and a jaunty yellow piece of Shibori pattern.
12. After that it was a question of pinning it all into place and working out which pieces needed stitching onto the backing first and then working up a layer as I sewed. The leaves I did on the sewing machine and the Tulip petals I hand stitched on.

I'm pretty happy with how this has turned out - it's brightening up my studio and adding some colour to my Easter quarantine.

I like the overall colour palette and think the yellow Shibori patterned fabric picks up the yellow of the Tulip petals nicely.


I hope that's given you some confidence to cut into your own stash of fabrics and have a go. Any questions - do email, I'd be happy to help if I can. Do let me know if you make something and I'd love to see what.
Breaking the six month silence

Today marks the beginning of week 2 of COVID quarantine. Not only has a lot happened since I last blogged 6 months ago but an enormous, life-shifting change has taken place in the last 7/10 days due to the virus we are suffering from worldwide.
Government enforced home-stay and the cancellation and postponement of all my freelance work sent me spinning at first and my Artist in Residence exhibition (planned for the end of May) is now up in the air date-wise.
I threw myself into the cathartic activity of sorting and cleaning my studio (which is at home) and that activity has helped me to calm myself and prepare to embrace a new chapter instead. It's been a major week-long purge of Stuff, organising projects half started which still want to be finished and ridding my workspace of what no longer serves or inspires. The space can breathe again and so can I.
[gallery ids="eyJ1cmwiOiJodHRwczpcL1wvcGFpbnRkcm9wc2tlZXBmYWxsaW5nLndwY29tc3RhZ2luZy5jb21cL3dwLWNvbnRlbnRcL3VwbG9hZHNcLzIwMjBcLzAzXC9zdHVkaW82LTEuanBnIiwidGl0bGUiOiJzdHVkaW82IiwiY2FwdGlvbiI6IiIsImFsdCI6IiIsImRlc2NyaXB0aW9uIjoiIn0=,eyJ1cmwiOiJodHRwczpcL1wvcGFpbnRkcm9wc2tlZXBmYWxsaW5nLndwY29tc3RhZ2luZy5jb21cL3dwLWNvbnRlbnRcL3VwbG9hZHNcLzIwMjBcLzAzXC9zdHVkaW81LTIuanBnIiwidGl0bGUiOiJzdHVkaW81IiwiY2FwdGlvbiI6IiIsImFsdCI6IiIsImRlc2NyaXB0aW9uIjoiIn0=,eyJ1cmwiOiJodHRwczpcL1wvcGFpbnRkcm9wc2tlZXBmYWxsaW5nLndwY29tc3RhZ2luZy5jb21cL3dwLWNvbnRlbnRcL3VwbG9hZHNcLzIwMjBcLzAzXC9zdHVkaW80LTIuanBnIiwidGl0bGUiOiJzdHVkaW80IiwiY2FwdGlvbiI6IiIsImFsdCI6IiIsImRlc2NyaXB0aW9uIjoiIn0=,eyJ1cmwiOiJodHRwczpcL1wvcGFpbnRkcm9wc2tlZXBmYWxsaW5nLndwY29tc3RhZ2luZy5jb21cL3dwLWNvbnRlbnRcL3VwbG9hZHNcLzIwMjBcLzAzXC9zdHVkaW8zLTEtMi5qcGciLCJ0aXRsZSI6InN0dWRpbzMiLCJjYXB0aW9uIjoiIiwiYWx0IjoiIiwiZGVzY3JpcHRpb24iOiIifQ==,eyJ1cmwiOiJodHRwczpcL1wvcGFpbnRkcm9wc2tlZXBmYWxsaW5nLndwY29tc3RhZ2luZy5jb21cL3dwLWNvbnRlbnRcL3VwbG9hZHNcLzIwMjBcLzAzXC9zdHVkaW8yLTEtMi5qcGciLCJ0aXRsZSI6InN0dWRpbzIiLCJjYXB0aW9uIjoiIiwiYWx0IjoiIiwiZGVzY3JpcHRpb24iOiIifQ==,eyJ1cmwiOiJodHRwczpcL1wvcGFpbnRkcm9wc2tlZXBmYWxsaW5nLndwY29tc3RhZ2luZy5jb21cL3dwLWNvbnRlbnRcL3VwbG9hZHNcLzIwMjBcLzAzXC9zdHVkaW8xLTIuanBnIiwidGl0bGUiOiJzdHVkaW8xIiwiY2FwdGlvbiI6IiIsImFsdCI6IiIsImRlc2NyaXB0aW9uIjoiIn0=" type="slideshow"]There is a collective feeling that the enforced slowing down is beneficial and I can feel that personally. It's causing all-sorts of reflection - the first being to breathe life back into this neglected space.
Mud Resist printing
It's hard to believe it today with all the rain being dumped from the sky but we have enjoyed some lovely sunny weather lately here in the UK and I have made the most of it with a spot of mud printing in our back garden.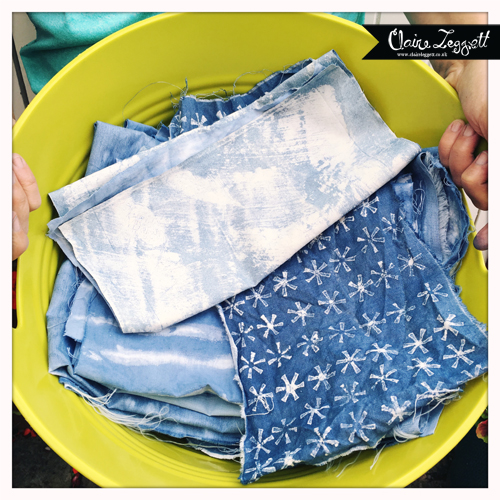
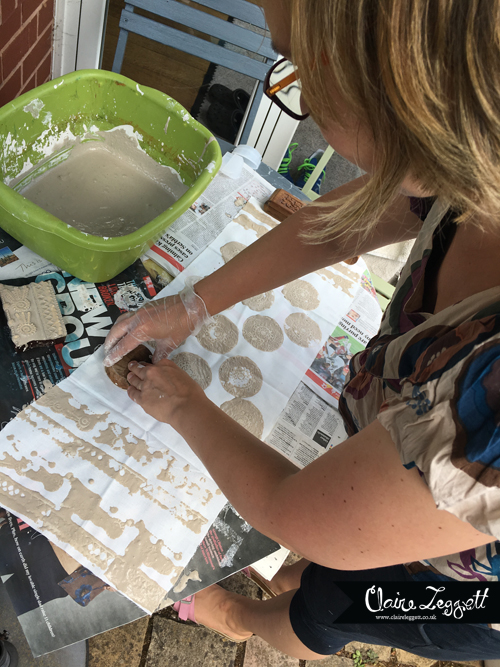
Printing with a mud paste can get a little messy so it’s great to be able to do it outdoors. In addition it’s very helpful when it then rains and washes all that mess away - easy clean-up :)
However the sunshine means that the paste can get dried out fairly quickly so you can go on with the next step in the process.
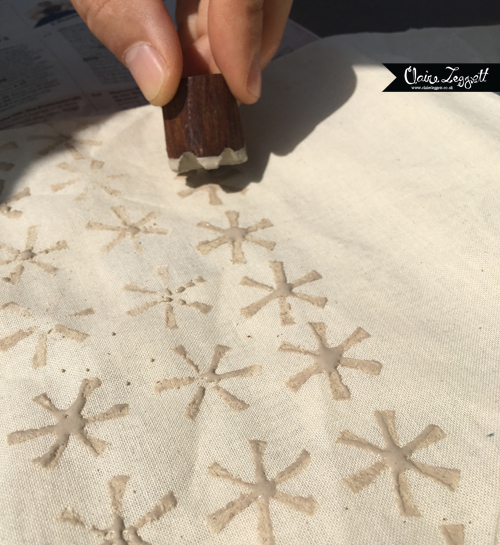
You may have seen block printing done with mud (Dabu) in India and of course not only do they have the heritage and skills but also the climate. Dabu printing is a traditional mud-resist hand-block printing art usually done with a wooden block (the metal blocks are more often used for batik printing as the wax can be melted off)
My receipe for the mud paste was little hit and miss – water, clay and lime powder which I tried to avoid using because it can burn your skin badly, but hb helped me out and we mixed it carefully with masks on - another good reason to be outside if you try this.
Make Mud Prints while the sun shines is my new saying!
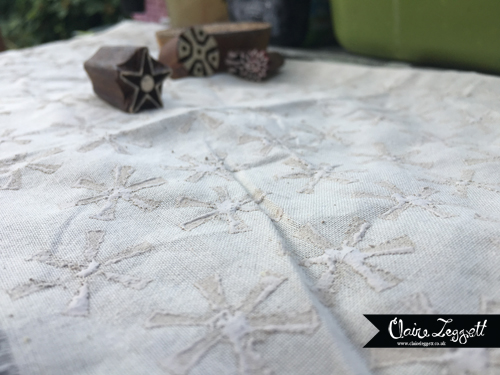
It’s possible to print with anything pretty much. I own quite a few wooden blocks some of which were excellent and some too fine to cope with the build up of mud after multiple layers had been applied. I also used foam shapes and cardboard rolls with good effect. And one of my favourites was simply a big brush applied in broad strokes.
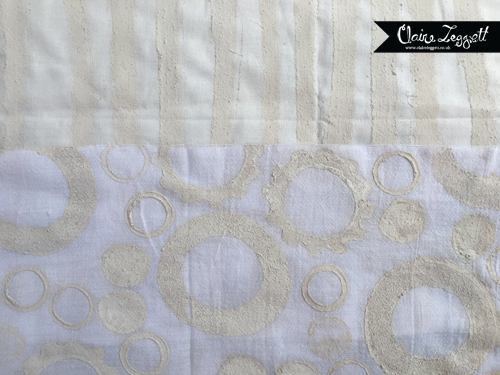
The mud acts as a resist to the dye and sometimes cracks during the drying process which can cause veining, which in my opinion adds to the final effect.
Once the paste has dried, you can apply colour.
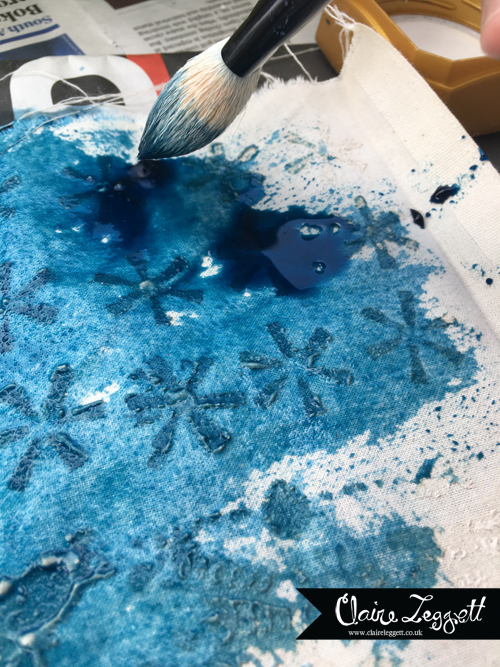
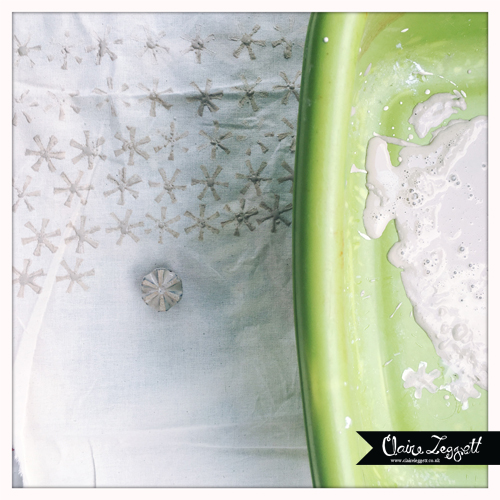
I used a Dylon hand dye so that it would be fixable and washable but I didn’t chance the dip-dye technique preferring to apply the dye with a brush and layer up the colour to make a good dark ‘indigo’ blue. It's worth mentioning that a pre-wash really helps prime the fabric to receiving the dye.
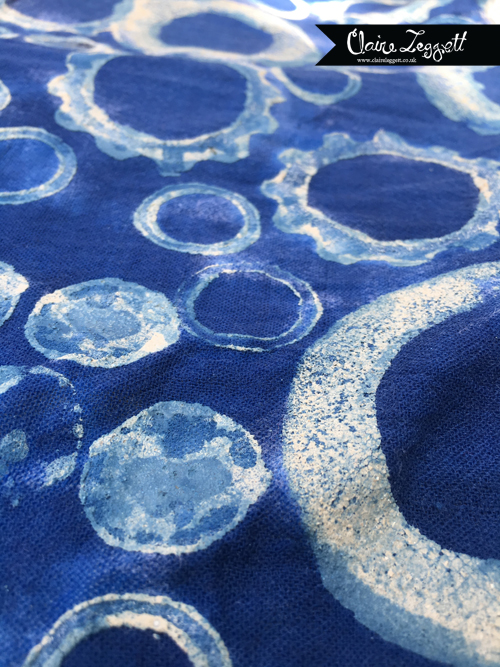
Finally it’s dried again and then you can hand wash out the mud and admire the beautiful fabric. Where the mud was will have repelled the dye leaving a white (or in some of my cases a much paler blue) print. It will probably be years before I dare to cut into these ;)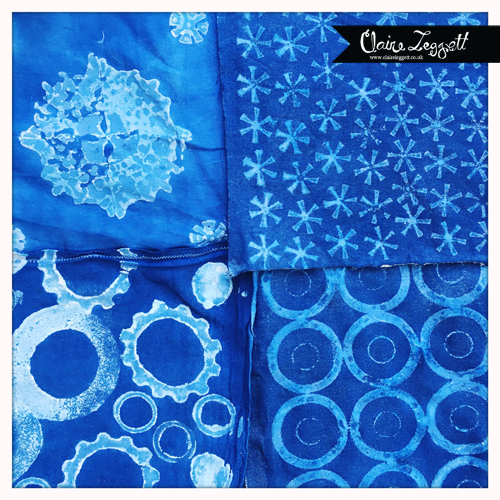 High on my wish list is a holiday in India with some authentic Dabu printing but until then the back yard will have to do.
